We are a month into the new school year and so far we are doing well in the lunch and snack department. Admittedly, we rotate quite a few of the main 'entree' potion of the meal and I change up the sides quite a bit. That's one of the reasons I haven't started posting my Week in Bentos section. I am planning on incorporating a new set of lunch main dishes, so hopefully I will be able to restart that section again.
Every weekend, I try to bake at least two different types of muffins or quick breads so that I can use them liberally in the kids' lunch and snack boxes. LG8 has a really late lunch time this year and needs a hearty snack to tide him over till then. We cant afford to have hungry stomachs interfere with learning minds :). Rather than just sliced apples or pretzels, I try including something slightly more filling. A baked snack bar, or a couple of mini muffins, sandwiches too. Flavorful, healthy quick breads made with multi grain flour and studded with dried fruits lend themselves to interesting sandwiches.
I was browsing around for recipes when I came across this one at Williams Sonoma. It looked very adaptable and pretty easy to assemble quickly. It would probably have been healthier to make my own applesauce, but store bought organic applesauce, with no added sugar was a good substitute!
Ingredients:
1 C unbleached all-purpose flour
1/2 C amaranth flour
1/4 C stoneground corn meal
1/4 C spelt flour
1 C walnuts, coarsely chopped, or 1 cup dark or golden raisins (I used raisins)
2/3 C sugar (I used a mix of regular sugar and coconut palm sugar)
2 tsp. baking powder
1/2 tsp. baking soda
1/2 tsp. salt
1 1/2 tsp. ground cinnamon
1 tsp. ground allspice
1/3 C neutral tasting oil (you could also use coconut oil for a nice change)
1/4 C sour cream or yogurt
1 heaping cup applesauce
1 tsp corn starch or arrowroot powder
Method:
1. Preheat oven to 350 °F. Grease a standard 9 X 5 loaf pan liberally with softened butter or oil.
2. In a bowl, stir together the dry ingredients - flours, nuts or dried fruits, sugar, baking powder, baking soda, salt, spices and the arrowroot or corn starch. Whisk thoroughly.
3. In another bowl, whisk the oil, sour cream and apple sauce to get a smooth homogeneous mixture.
4. Stir the wet ingredients into the dry ingredients until it is evenly moistened. Mix with a light hand so that the bread doesn't end up as a dense block.
4. Pour into the prepared loaf pan and bake for about 55 minutes. Keep checking for doneness after 50 minutes.
5. Remove from the oven when an inserted toothpick comes out clean.
6. Cool in the pan for about 5 minutes and then remove to a wire rack until it cools completely.
7. If possible, do not slice into the bread until it has completely cooled down. It makes such a big difference to the texture and the crumb of the bread!
8. Slice evenly with a serrated knife and serve with butter, jam, peanut butter or even cream cheese for a yummy snack!
Notes:
1. The original recipe called for 2 C of all purpose flour. I replaced half of it with various other flours that I had on hand. Use whatever you have available.
2. The original recipe also called for 1 egg that I replaced with sour cream. You could use yogurt, commercial egg replacers or any other substitute of choice.
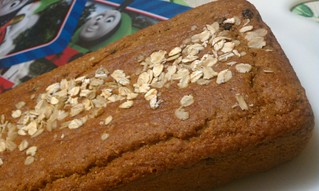
3. I sprinkled the top of the bread with some rolled oats before baking for visual appeal!
4. The apple loaf turned out pretty tasty. I sent this in snack boxes, sandwiched with some cream cheese and jelly. It tastes delicious even plain with some soft butter.
5. You could also make mini or regular sized muffins with the same batter. Mini muffins take around 15 - 17 minutes and regular sized muffins need around 22 -24 minutes. If you use smaller loaf pans, adjust the time accordingly.
6. You could add other add-ins such as chopped apples, mini chocolate chips, butterscotch chips, etc. for a variation on the same bread.
Do give it a try!
Every weekend, I try to bake at least two different types of muffins or quick breads so that I can use them liberally in the kids' lunch and snack boxes. LG8 has a really late lunch time this year and needs a hearty snack to tide him over till then. We cant afford to have hungry stomachs interfere with learning minds :). Rather than just sliced apples or pretzels, I try including something slightly more filling. A baked snack bar, or a couple of mini muffins, sandwiches too. Flavorful, healthy quick breads made with multi grain flour and studded with dried fruits lend themselves to interesting sandwiches.
I was browsing around for recipes when I came across this one at Williams Sonoma. It looked very adaptable and pretty easy to assemble quickly. It would probably have been healthier to make my own applesauce, but store bought organic applesauce, with no added sugar was a good substitute!
Ingredients:
1 C unbleached all-purpose flour
1/2 C amaranth flour
1/4 C stoneground corn meal
1/4 C spelt flour
1 C walnuts, coarsely chopped, or 1 cup dark or golden raisins (I used raisins)
2/3 C sugar (I used a mix of regular sugar and coconut palm sugar)
2 tsp. baking powder
1/2 tsp. baking soda
1/2 tsp. salt
1 1/2 tsp. ground cinnamon
1 tsp. ground allspice
1/3 C neutral tasting oil (you could also use coconut oil for a nice change)
1/4 C sour cream or yogurt
1 heaping cup applesauce
1 tsp corn starch or arrowroot powder
Method:
1. Preheat oven to 350 °F. Grease a standard 9 X 5 loaf pan liberally with softened butter or oil.
2. In a bowl, stir together the dry ingredients - flours, nuts or dried fruits, sugar, baking powder, baking soda, salt, spices and the arrowroot or corn starch. Whisk thoroughly.
3. In another bowl, whisk the oil, sour cream and apple sauce to get a smooth homogeneous mixture.
4. Stir the wet ingredients into the dry ingredients until it is evenly moistened. Mix with a light hand so that the bread doesn't end up as a dense block.
4. Pour into the prepared loaf pan and bake for about 55 minutes. Keep checking for doneness after 50 minutes.
5. Remove from the oven when an inserted toothpick comes out clean.
6. Cool in the pan for about 5 minutes and then remove to a wire rack until it cools completely.
7. If possible, do not slice into the bread until it has completely cooled down. It makes such a big difference to the texture and the crumb of the bread!
8. Slice evenly with a serrated knife and serve with butter, jam, peanut butter or even cream cheese for a yummy snack!
Notes:
1. The original recipe called for 2 C of all purpose flour. I replaced half of it with various other flours that I had on hand. Use whatever you have available.
2. The original recipe also called for 1 egg that I replaced with sour cream. You could use yogurt, commercial egg replacers or any other substitute of choice.
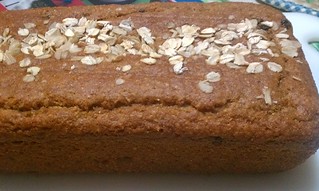
3. I sprinkled the top of the bread with some rolled oats before baking for visual appeal!
4. The apple loaf turned out pretty tasty. I sent this in snack boxes, sandwiched with some cream cheese and jelly. It tastes delicious even plain with some soft butter.
5. You could also make mini or regular sized muffins with the same batter. Mini muffins take around 15 - 17 minutes and regular sized muffins need around 22 -24 minutes. If you use smaller loaf pans, adjust the time accordingly.
6. You could add other add-ins such as chopped apples, mini chocolate chips, butterscotch chips, etc. for a variation on the same bread.
Do give it a try!

